Joshua and Jacob had great fun helping me mix the batter, add the eggs, make the mess.
Jacob especially (see photo) loves to help clean the beaters. He's such a helper.

I took this picture of the Dinosaur cake to prove I had done it, just in case it came out so well you wouldn't know the difference. :)

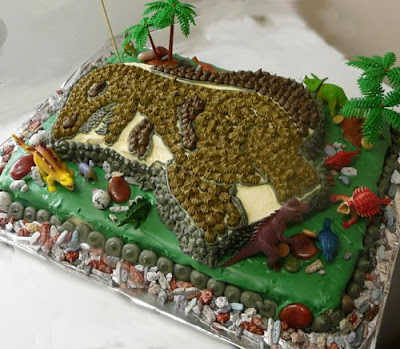
And here is the final cake we like to call "Dino Island". I used two 9 x 13 sheet cake pans for the bottom, base part of the cake.
I foil wrapped a very large cookie sheet for the cake to be placed on, but you can also buy actual cake boards if you want something more professional.
The shiny green frosting is actually called ganache, which is a combination of chocolate (in this case, green colored white chocolate) and heavy cream. You melt these together and once it sets up, you can pour it onto any cake. It has a nice, light creamy taste to it, but is quite a bit heavier than whipped cream.
The dinosaur on top is a dinosaur mold pan that I ordered from CK Products, but you may be able to find them elsewhere. (Hobby Lobby, Walmart?)
The frosting on the dinosaur as well as the border is a buttercream that I think is a fairly traditional recipe made with butter flavored crisco, butter, powdered sugar, vanilla and milk, but I do add almond extract. I think it gives it a bit of a richer taste.
The frosting on the dinosaur as well as the border is a buttercream that I think is a fairly traditional recipe made with butter flavored crisco, butter, powdered sugar, vanilla and milk, but I do add almond extract. I think it gives it a bit of a richer taste.
A closer look...I ran into Target for some household/Easter items, and lucky for me, they had these cute little packets of dinosaurs that also came with their own fake little prehistoric looking trees.
I also purchased these chocolate rocks and pebbles from Country Kitchen, and they fit perfectly with the whole theme.
I also purchased these chocolate rocks and pebbles from Country Kitchen, and they fit perfectly with the whole theme.
 I piped three different colors onto the dinosaur, and used different tips to give him a more 3 dimensional and scaly appearance. I left the crumb coat (the white buttercream you can see) as it was, because it made the dinosaur stand out more than if I would have piped some more white into that area.
This is just another photo showing the dinosaur/rock/tree combo.

I printed out a sign that said "Happy 5th Birthday Joshua", and cut it out in the shape of a flag and glued it to a bamboo stick. We used this instead of writing his name on the cake with icing.
I really couldn't figure out where to write it anyway.
Here are the boys posing with Joshua's cake. I later asked Joshua what the best part of his birthday was and he said, "The dinosaur cake." I nearly melted.

And in non cake related news, Joshua received his first ever bike (with training wheels of course), with matching safety gear.
Now, if the snow would please melt and never come back, we'd like to test drive this thing!
Here are some of my previous attempts. I couldn't quickly find the pictures of the Aladdin or SpongeBob ones, but you aren't missing anything, believe me.
This cake for Jacob's second birthday was done in the summer at a lake cottage we rented.
I kept it very simple, but he also really loved balls at the time, so it fit.

This one was for Joshua's 4th birthday. He was (and still is) very into the Geotrax trains, and we had gotten him a big set for his birthday. So, I placed some pieces from his old set onto the cake and just piped around everything to look like grass.


No comments:
Post a Comment